Personalise my view
Build your own key holder
With decades of experience under his tool belt, TAFE Queensland Carpentry Teacher, John Kertes, knows a thing or two about DIY. He recently shared this practical (and fun!) key holder project with some budding, young carpenters-in-training.
Why not try it at home yourself? You can choose the natural wood look or paint it to suit your home’s décor.
Follow our step-by-step guide to nail your very own key holder.
Materials
- 42mm x 19mm Tasmanian oak (optional) 150mm in length
- 2.5mm drill bit
- 4 x 14mm cup hooks
- 300mm x 3mm Venetian blind cord (or similar)
- 2 x 25mm x 1.8mm flat head nails
- P180 grit sand paper (or similar)
Directions
- Select a timber (hardwood is best), Tasmanian oak is a great choice.
- Choose a length of timber with the following specifications of: 42mm x 19mm Dressed All Round (DAR). This means it is smooth.
- Cut the timber to 150mm.
- Sand the edges of the timber with the P180 grit sand paper.
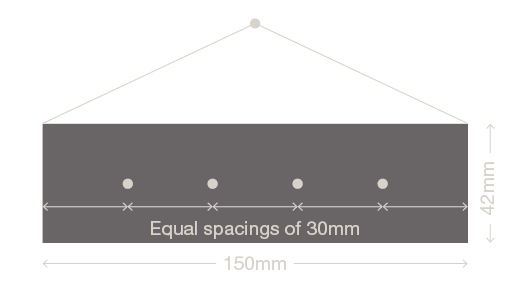
- Mark the face of the timber (42mm side) in 4 places, with 30mm between each mark.
- Drill 4 holes with 2.5mm drill bit, to a depth of 15mm deep
- Place the timber in a vice (vertically) and nail through each end of the Venetian blind cord (approximately 15mm from the ends) into the timber.
- Screw the cup hooks into the predrilled holes (make sure they are all in the same direction).
Key holder template
